On This Page
- Overview
- Setting Up Amazon S3 Buckets for Compass
- Managing Existing Amazon S3 Buckets for Compass
- Setting up Microsoft Azure Containers for Compass
- Managing Existing Microsoft Azure Containers for Compass
- Configuring File Formats for Delivery Locations
Overview
The Delivery Configuration page allows System Administrators to set up, update, and test the delivery locations that will be available to users at job submission, as well as manage the available file formats that can be sent to each delivery location. The Delivery Configuration page can be accessed via the Setup > Delivery tab.
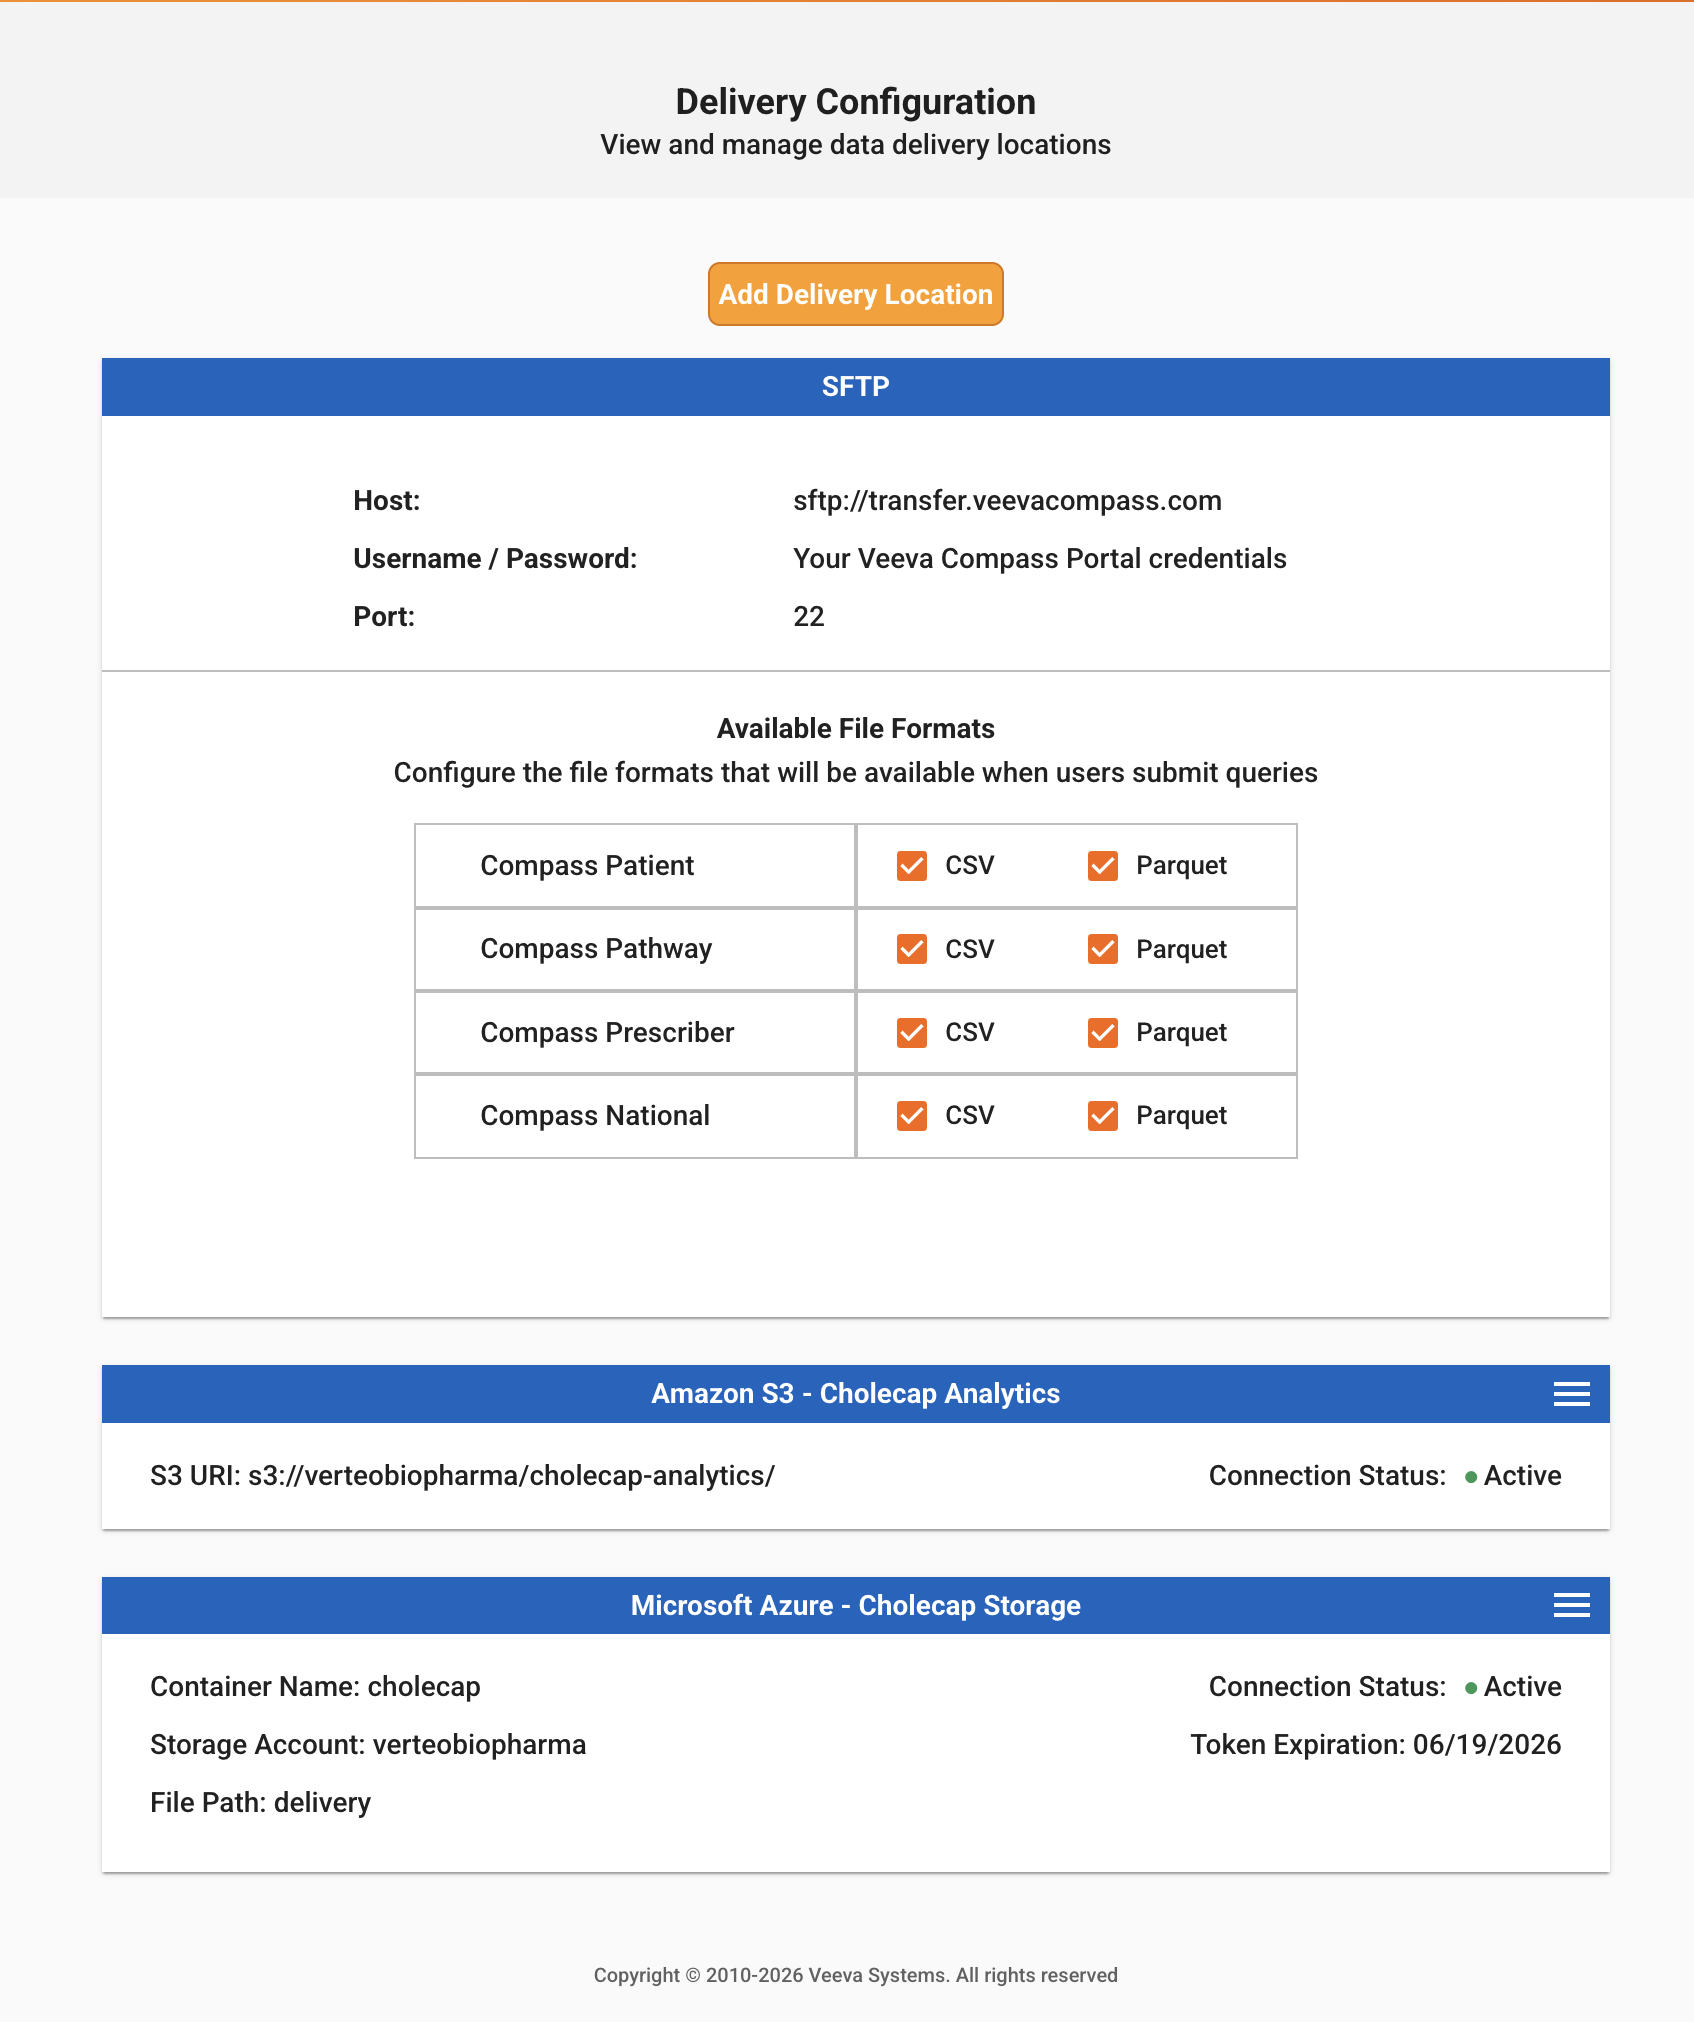
The Delivery Configuration page displays the following delivery locations:
- SFTP is a Veeva-hosted secure file location which allows users to use an SFTP client (such as FileZilla or CyberDuck) to connect, navigate and download their data files.
- Amazon S3 allows you to deliver your data files to Amazon S3. You are able to pre-configure multiple Amazon S3 buckets for delivery.
- Microsoft Azure allows you to deliver your data files to Microsoft Azure. You are able to pre-configure multiple Microsoft Azure containers for delivery.
- Veeva CRM allows users to deliver Veeva Compass Patient or Prescriber data directly to the field team, through powerful X-Pages content. The Veeva CRM option is available for users with an active Veeva CRM X-Pages subscription.
- Vault CRM allows users to deliver Veeva Compass Patient or Prescriber data directly to the field team, through powerful X-Pages content. The Vault CRM option is available for users with an active Vault CRM X-Pages subscription.
- Veeva Nitro is a data science and analytics platform that seamlessly integrates with Veeva Compass. Nitro provides faster access to your data, so you have your data ready for querying, visualizing and reporting. The Nitro option is available for users with an active Nitro subscription.
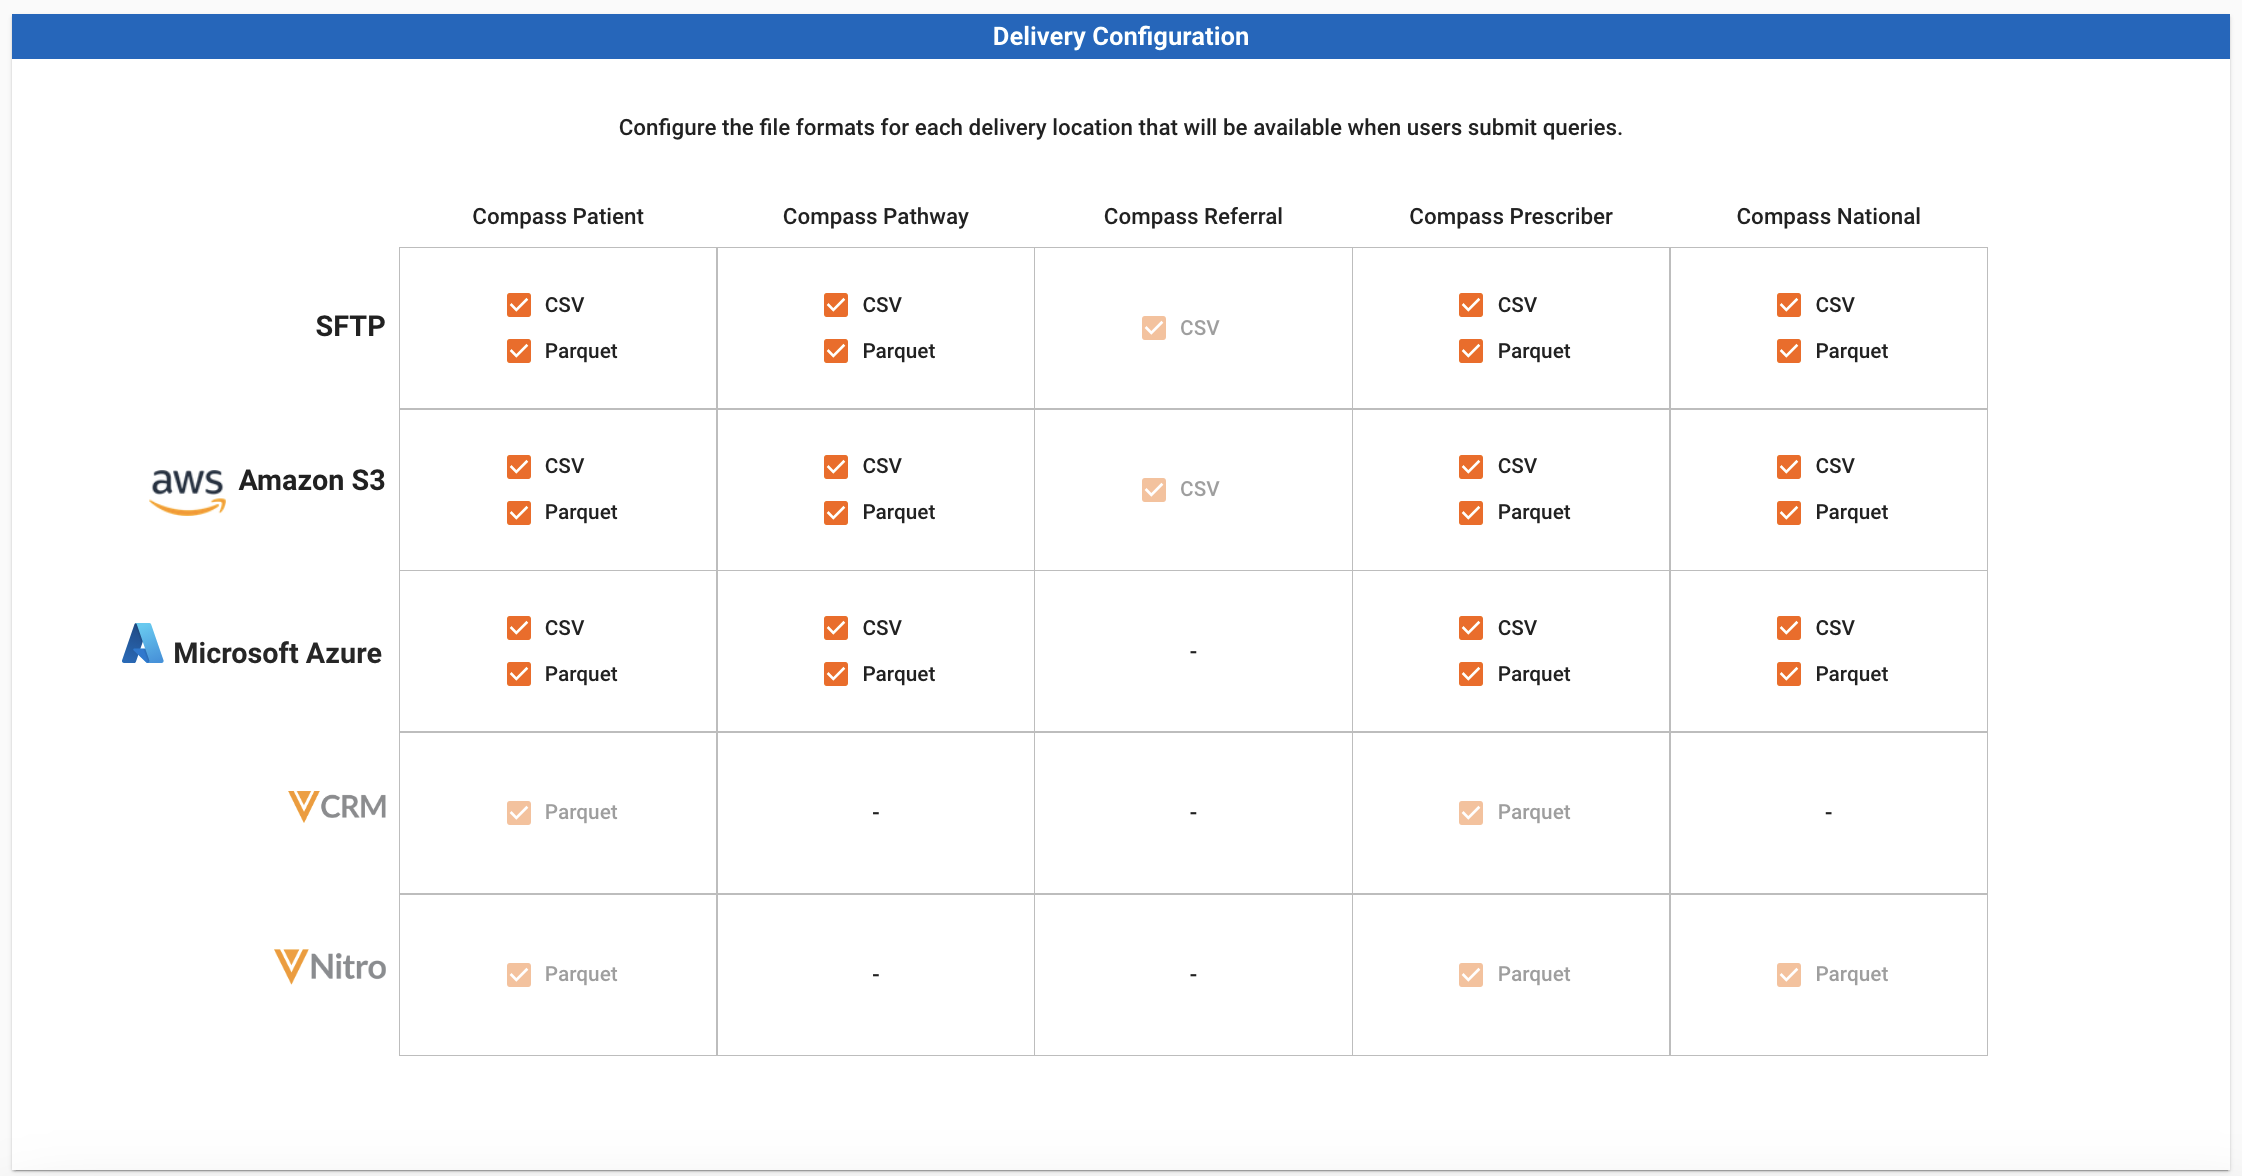
The Delivery Configuration page allows you to configure which file formats users can select at job submission for the following subproducts and delivery locations. Note that deliveries for Compass Data Connector cannot currently be configured within the UI.
| Subproduct | Available File Formats | Available Delivery Locations |
|---|---|---|
| Patient | CSV, Parquet | SFTP, Amazon S3, Microsoft Azure, Veeva Nitro, Veeva CRM, Vault CRM |
| Pathway | CSV, Parquet | SFTP, Amazon S3, Microsoft Azure |
| Prescriber | CSV, Parquet | SFTP, Amazon S3, Microsoft Azure, Veeva Nitro, Veeva CRM, Vault CRM |
| Zip | CSV, Parquet | SFTP, Amazon S3, Microsoft Azure, Veeva Nitro, Veeva CRM, Vault CRM |
| National | CSV, Parquet | SFTP, Amazon S3, Microsoft Azure, Veeva Nitro |
| State | CSV, Parquet | SFTP, Amazon S3, Microsoft Azure, Veeva Nitro |
Setting Up Amazon S3 Buckets for Compass
Compass allows you to directly deliver your data files to an Amazon S3 bucket. Before setting up delivery to an S3 bucket in Compass, a dedicated S3 bucket or buckets should first be created with a bucket path of one level. Compass supports the setup of multiple S3 buckets for delivery.
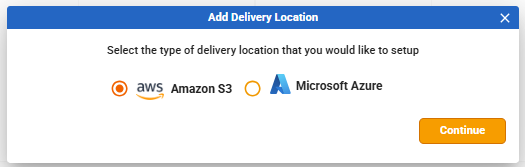
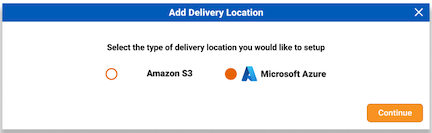
Once a dedicated S3 bucket has been created, you can set up your S3 bucket as an available delivery location by clicking on the “Add Delivery Location” button located at the top of the page.
Next, select Amazon S3 as the type of delivery location to be set up, then click Continue. For more information on Azure container setup, see Setting up a Microsoft Azure container.
To deliver Compass data to an Amazon S3 bucket, the following fields are required:
- Name - Bucket name for the Amazon S3 bucket, which will be displayed to users setting up jobs.
- Names can only contain alphanumeric characters, underscores, and spaces.
- S3 URI - Bucket file path where you would like data to be delivered to.
- Should be formatted s3://{bucket name}/{object key};
- S3 URI bucket name must be between 3 and 63 characters, can only contain lowercase letters, numbers, periods (.), or hyphens (-), and must begin and end with an alphanumeric character
- S3 URI object keys can only contain alphanumeric characters and the following special characters: ( ! ), ( - ), ( _ ), ( . ), ( * ), ( ‘ ), ( ( ), ( ) )
Compass requires Names and S3 URIs to be unique for each bucket that is set up.
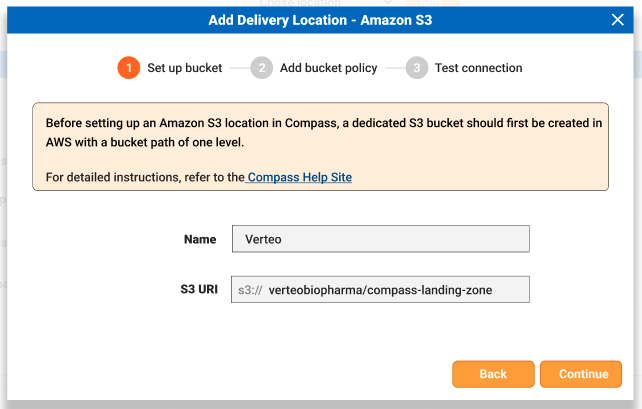
Once the information has been populated, click “Continue”.
Compass will then generate a bucket policy to be added to your S3 bucket that will allow Compass data to be pushed to your bucket.
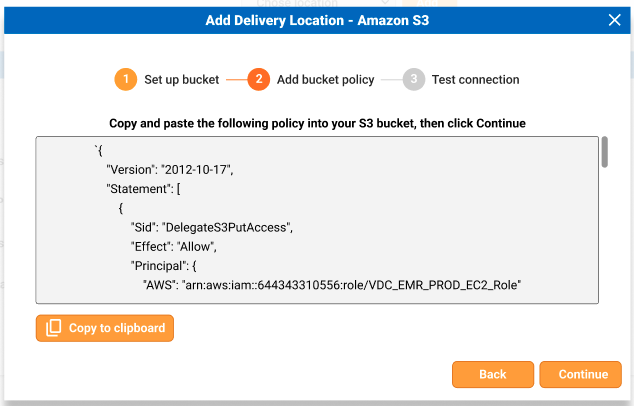
See below for an example bucket policy.
{
    "Version": "2012-10-17",
    "Statement": [
        {
            "Effect": "Allow",
            "Principal": {
                "AWS": "arn:aws:iam::644343310556:role/VDC_EMR_PROD_EC2_Role"
            },
            "Action": [
                "s3:GetObject"
            ],
            "Resource": [
                "arn:aws:s3:::<BUCKET_NAME>/<PREFIX>/*"
            ]
        },
        {
            "Effect": "Allow",
            "Principal": {
                "AWS": "arn:aws:iam::644343310556:role/VDC_EMR_PROD_EC2_Role"
            },
            "Action": [
                "s3:ListBucket"
            ],
            "Resource": [
                "arn:aws:s3:::<BUCKET_NAME>"
            ],
            "Condition": {
                "StringLike": {
                    "s3:prefix": [
                        "<PREFIX>*"
                    ]
                }
            }
        },
        {
            "Effect": "Allow",
            "Principal": {
                "AWS": "arn:aws:iam::644343310556:role/VDC_EMR_PROD_EC2_Role"
            },
            "Action": [
                "s3:PutObject",
                "s3:PutObjectAcl"
            ],
            "Resource": [
                "arn:aws:s3:::<BUCKET_NAME>/<PREFIX>/*"
            ],
            "Condition": {
                "StringEquals": {
                    "s3:x-amz-acl": "bucket-owner-full-control"
                }
            }
        }
    ]
}
Copy and paste the policy into your S3 bucket, then click “Continue”.
Compass will then attempt to test the connection to the S3 bucket by pushing a small test file to your bucket. This may take a few minutes. If the test cannot be successfully completed, Compass will display an error message so that you can troubleshoot the connection. Once successful, the test will show as completed.
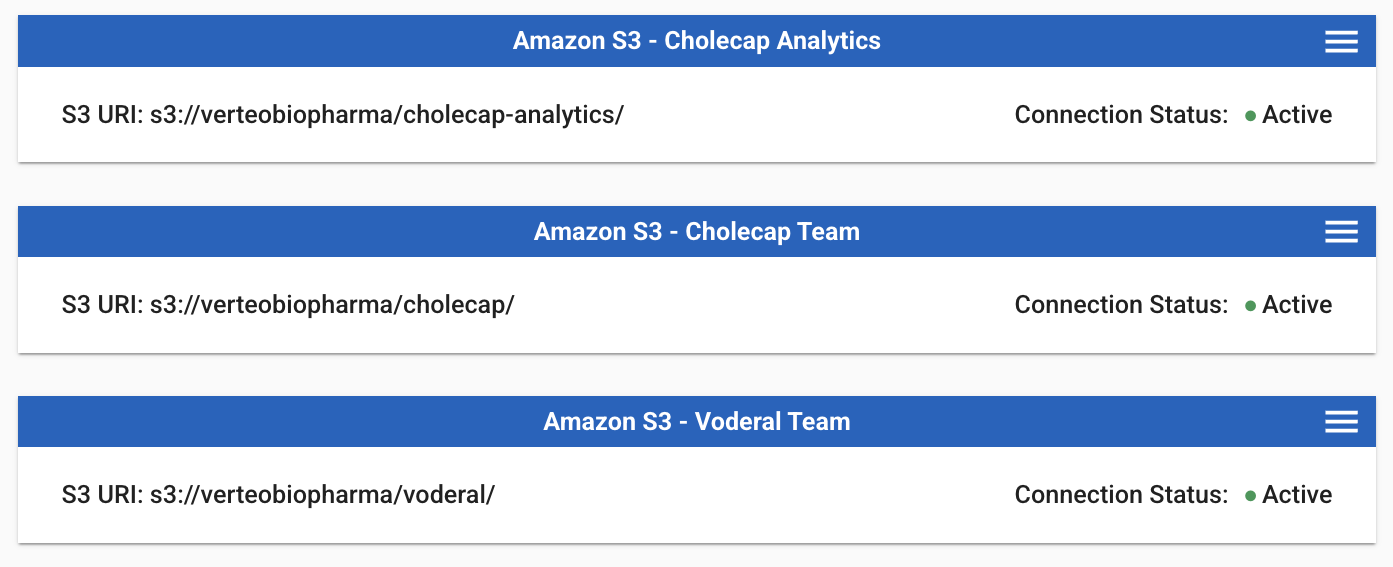
The newly configured Amazon S3 bucket will now show up in the list of available delivery locations. To set up additional Amazon S3 buckets for Compass delivery, repeat the steps above for each bucket that needs to be set up.
Managing Existing Amazon S3 Buckets for Compass
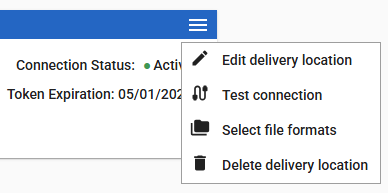
You can manage your existing S3 bucket by clicking on the hamburger icon in the top right corner of the bucket’s delivery panel and selecting a function from the dropdown menu.
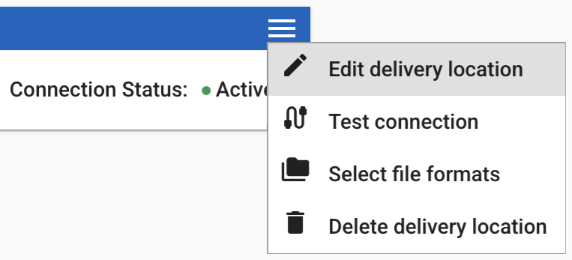
Available options include:
- Edit delivery location allows you to update the S3 bucket name and URI, as well as to retrieve an updated bucket policy.
- Test connection allows you to re-rest your connection directly within the interface.
- Select file formats allows you to choose which file formats are available to be sent to that delivery location at the time of job setup. See Configuring File Formats for Delivery Locations for more details.
- Delete delivery location allows you to remove this delivery location from the list of available delivery locations when submitting jobs. Note that this action cannot be reversed, and any scheduled jobs being sent to that S3 bucket will no longer be sent to that location.
Setting up Microsoft Azure Containers for Compass
Compass allows you to directly deliver your data files to a Microsoft Azure container. In order to setup an Azure container in Compass, a dedicated container for Veeva should first be created. Compass supports the setup of multiple Azure containers for delivery.
Once a dedicated Azure container has been created, you can set up your Azure container as an available delivery location by clicking on the “Add Delivery Location” button located at the top of the page.
Next, select Microsoft Azure as the type of delivery location to be set up, then click Continue. For information on S3 bucket setup, see Setting up an Amazon S3 Bucket.
To deliver Compass data to a Microsoft Azure container, the following fields are required:
- Display Name - A user-defined value that will be used to reference the container when setting up jobs.
- Container Name - Name for the Microsoft Azure container.
- Container name can only contain lowercase letters, numbers, and hyphens, must be between 3 and 63 characters long, and must begin with an alphanumeric character.
- Storage Account Name - Name of the storage account for the Microsoft Azure container.
- Storage account name can only contain lowercase letters and numbers, and must be between 3 and 24 characters.
- Storage Folder Path - Folder path where you would like data to be delivered to.
- Folder path should not end with any of the following characters: periods (.), forward slash (/), backwards slash (), and must be between 1 and 1,024 characters.
- SAS Token
- Direct container access is required for Azure integration, and SAS tokens should contain “sr=c” permissions. Utilizing “sr=c” in the token grants access to the entire container, and is not limited to the individual blobs within it.
- The SAS token must contain read, write, and delete permissions such as shown in the below sample token value. Delivery requires delete permission to clean up temporary files and directories created during the distributed copy process, ensuring the storage remains organized as well as removing unnecessary files and reducing storage space needed.
Compass requires Display Names, as well as the combination of Container Name, Storage Account Name, and Storage Folder Path, to be unique for each container that is set up.
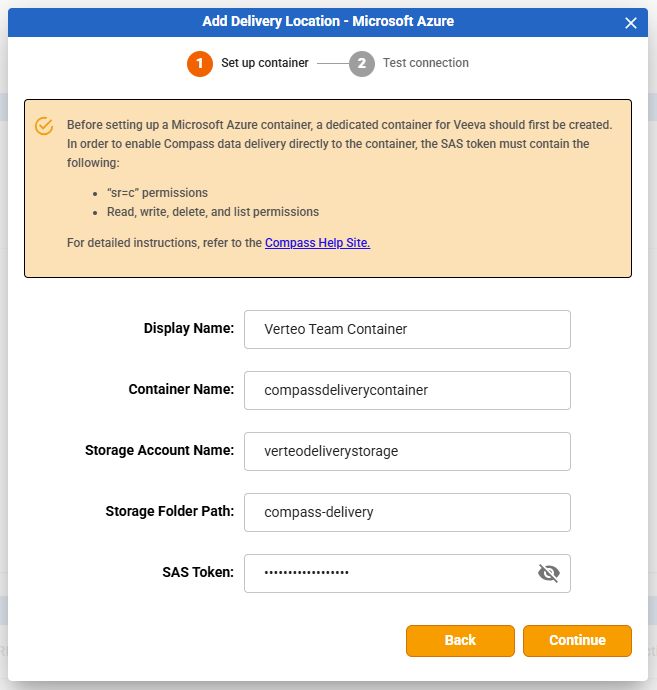
See below for example values for the fields.
Container Name: "compassdeliverycontainer"
Storage Account Name: "verteodeliverystorage"
Storage Folder Path: "compass-delivery"
SAS Token: "sp=rwdl&st=2025-06-30T19:20:23Z&se=2026-06-20T03:20:03Z&spr=https&sv=2022-11-02&sr=c&sig=abc4oNyKBxLIpyRTAt4caz8P57%2123a8L3EP%2Fn%2FABCPA%3A"
Once the information has been populated, click “Continue”.
Compass will then attempt to test the connection to the Azure container by pushing a small test file to your container. This may take a few minutes. If the test cannot be successfully completed, Compass will display an error message so that you can troubleshoot the connection. Once successful, the test will show as completed.
The newly configured Azure container will now show up in the list of available delivery locations. To set up additional Azure containers for Compass delivery, repeat the steps above for each container that needs to be set up.
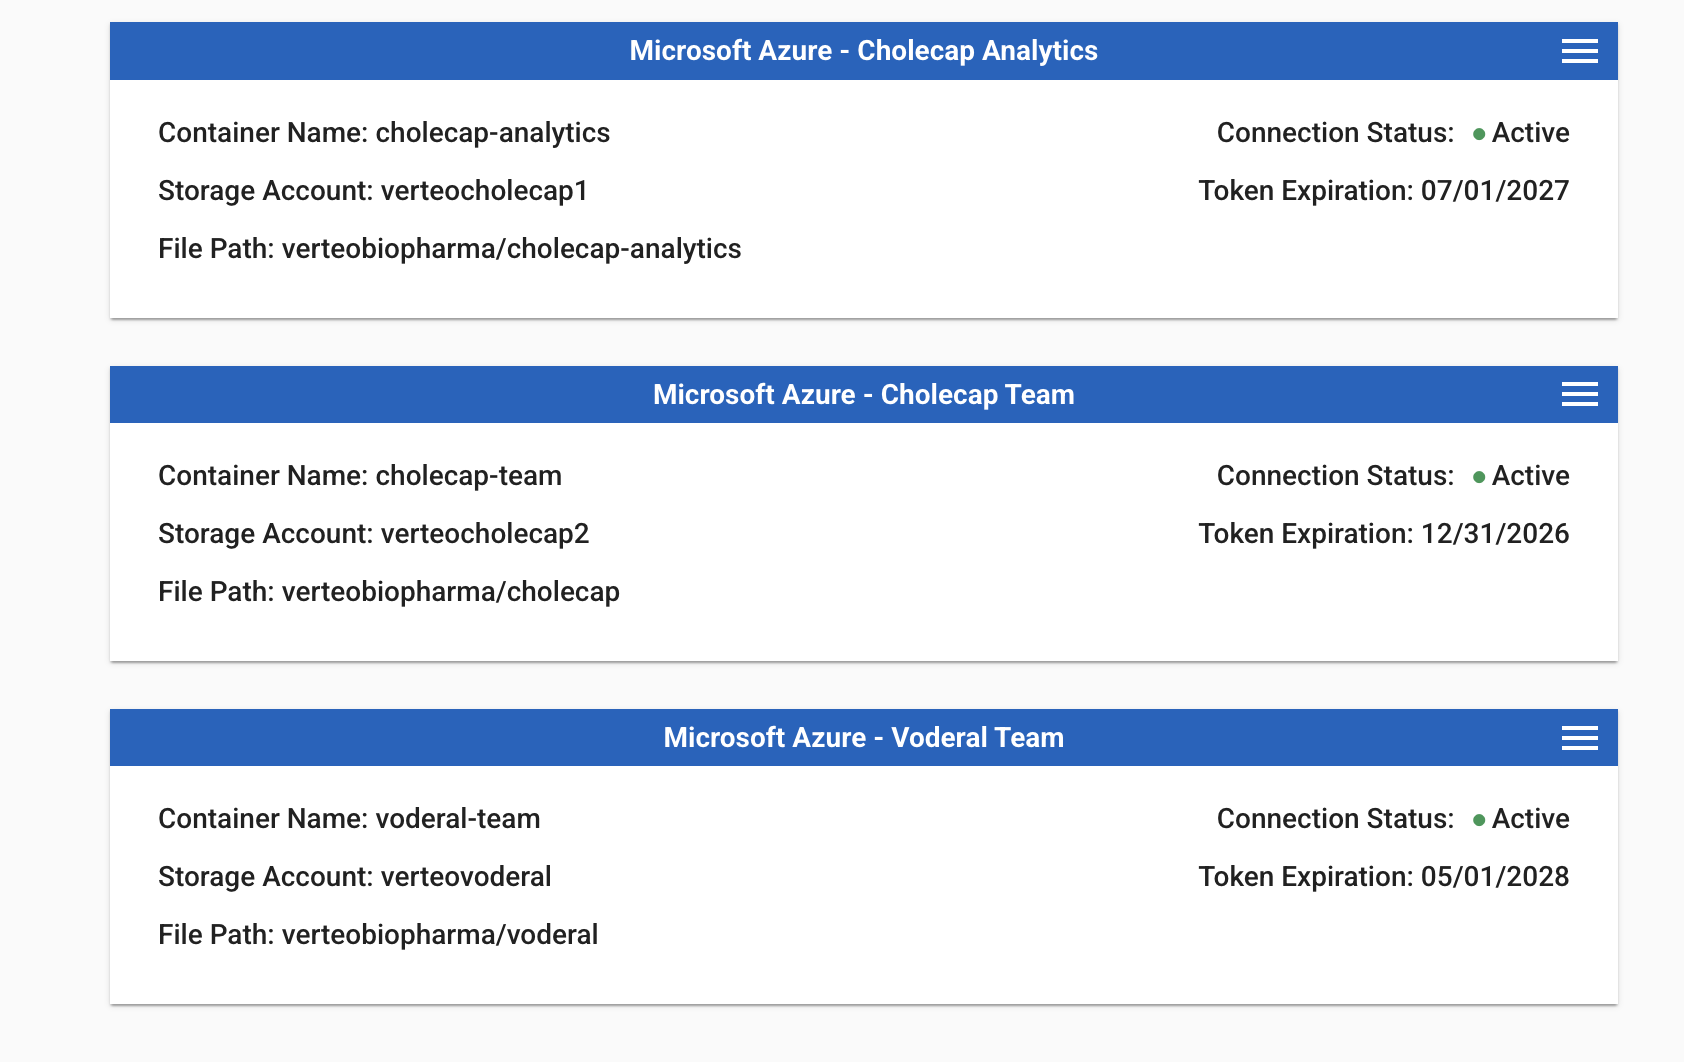
Managing Existing Microsoft Azure Containers for Compass
You can manage your existing Azure container by clicking on the hamburger icon in the top right corner of the bucket’s delivery panel and selecting a function from the dropdown menu.
Available options include:
- Edit delivery location allows you to update the display name, container name/path details, and SAS token.
- Test connection allows you to re-rest your connection directly within the interface.
- Select file formats allows you to choose which file formats are available to be sent to that delivery location at the time of job setup. See Configuring File Formats for Delivery Locations for more details.
- Delete delivery location allows you to remove this delivery location from the list of available delivery locations when submitting jobs. Note that this action cannot be reversed, and any scheduled jobs being sent to that Azure container will no longer be sent to that location.
Configuring File Formats for Delivery Locations
Available file formats for each delivery location and Compass product can be configured by enabling/disabling the file format (CSV, Parquet) checkboxes for each location/Compass product.

Currently, Compass supports both Parquet and CSV for Patient & Pathway data. For Veeva CRM, Vault CRM, and Veeva Nitro, all files are sent in Parquet format. Note that each delivery location must have at least one file format selected. For more information on the data delivery files for Parquet and CSV, refer to Understanding the Files & Format
The configured file formats determine what is available to users when they pull data. For example, if both CSV and Parquet are selected for Compass Patient SFTP, then users will be able to select either CSV or Parquet for their file format delivered to SFTP when they go to submit their Compass Patient data pull. For more information on selecting file formats when doing a Patient data pull, refer to Delivery Options.
If only one file format is configured for a location, all data pulls will default to that configured file format for that location. For example, if CSV only is selected for Compass Pathway Amazon S3, then users will only be able to send CSV format to Amazon S3 when they submit their Compass Pathway data pull.
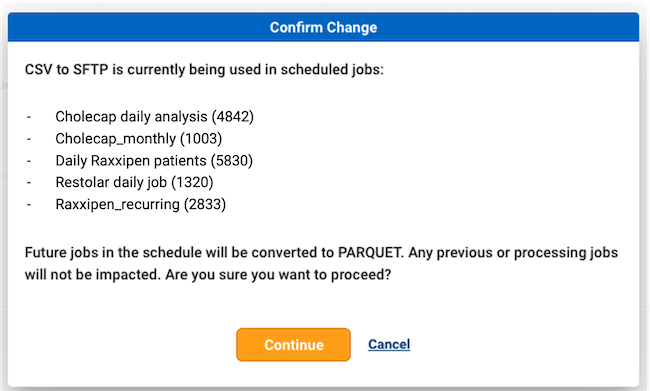
File Formats for Scheduled Jobs
When disabling a file format that is currently being used in a scheduled job, all future jobs in the schedule will be converted to the allowed file format. For example, if you disable CSV for Compass Patient SFTP while that format and location is being used for a Compass Patient scheduled job, all future jobs will be converted to Parquet for SFTP. You will see a confirmation modal containing the list of impacted jobs prior to converting.