On This Page
Navigating Job Manager
The Job Manager tab allows you to manage submitted and draft queries. You can toggle between viewing submitted queries/jobs and draft queries by using the buttons at the top. By default, “Jobs” is selected. To view your draft queries, select “Drafts”. For more information on drafts, refer to Managing Drafts.

To navigate through the job/draft tables, use the right and bottom scroll bars. You can sort on columns in the table by hovering over and clicking on the column headers. You can also adjust the width of columns by hovering over the column border and dragging the column to the desired width.
Managing Submitted Jobs
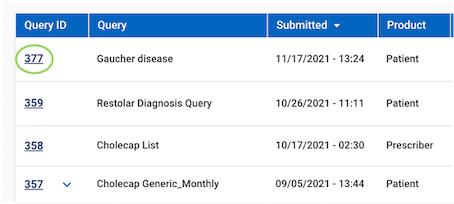
The jobs table contains high-level information about your submitted queries/jobs. The following information is displayed in the jobs table:
- Query ID - The query ID for that query. Scheduled jobs have multiple jobs within a single query ID, while one time pulls have one query ID per job.
- Job ID - The job ID for the individual job. Scheduled jobs have multiple job IDs within a single query.
- Query - Name provided for that query upon submitting.
- Submitted - Date & time the query was submitted.
- Compass Product - Veeva Compass product for that query (e.g. Patient, Pathway, Prescriber, National).
- Subproduct - Subproduct for that query, or the type of data that will be received (e.g. Patient, Pathway, Prescriber, Zip, National, State)
- Initiated By - User who submitted the query, which can be viewed by hovering over the user icon.
- Schedule - Delivery schedule (one time, monthly, weekly, daily) for that query.
- Status - Current status of the query (e.g. processing, completed, failed, scheduled, delivering)
- Completed Date - Date & time the query or job finished processing or is scheduled for (for recurring jobs).
- Actions - Actions that are available to that specific query (e.g. duplicate, edit, schedule, share, download). For more information on submitted query actions, see Job Manager Actions (Submitted).
Query Receipt
The query receipt contains detailed information about your query, such as the delivery location and SFTP directory (if applicable), timeframes, and a list of the products, diagnoses and/or procedures included in your query. To view a query receipt, click on the Query ID. This will open the receipt in a new window. You can close a query receipt by clicking the X in the upper-right corner of the window, or by clicking anywhere on the screen outside of the receipt.
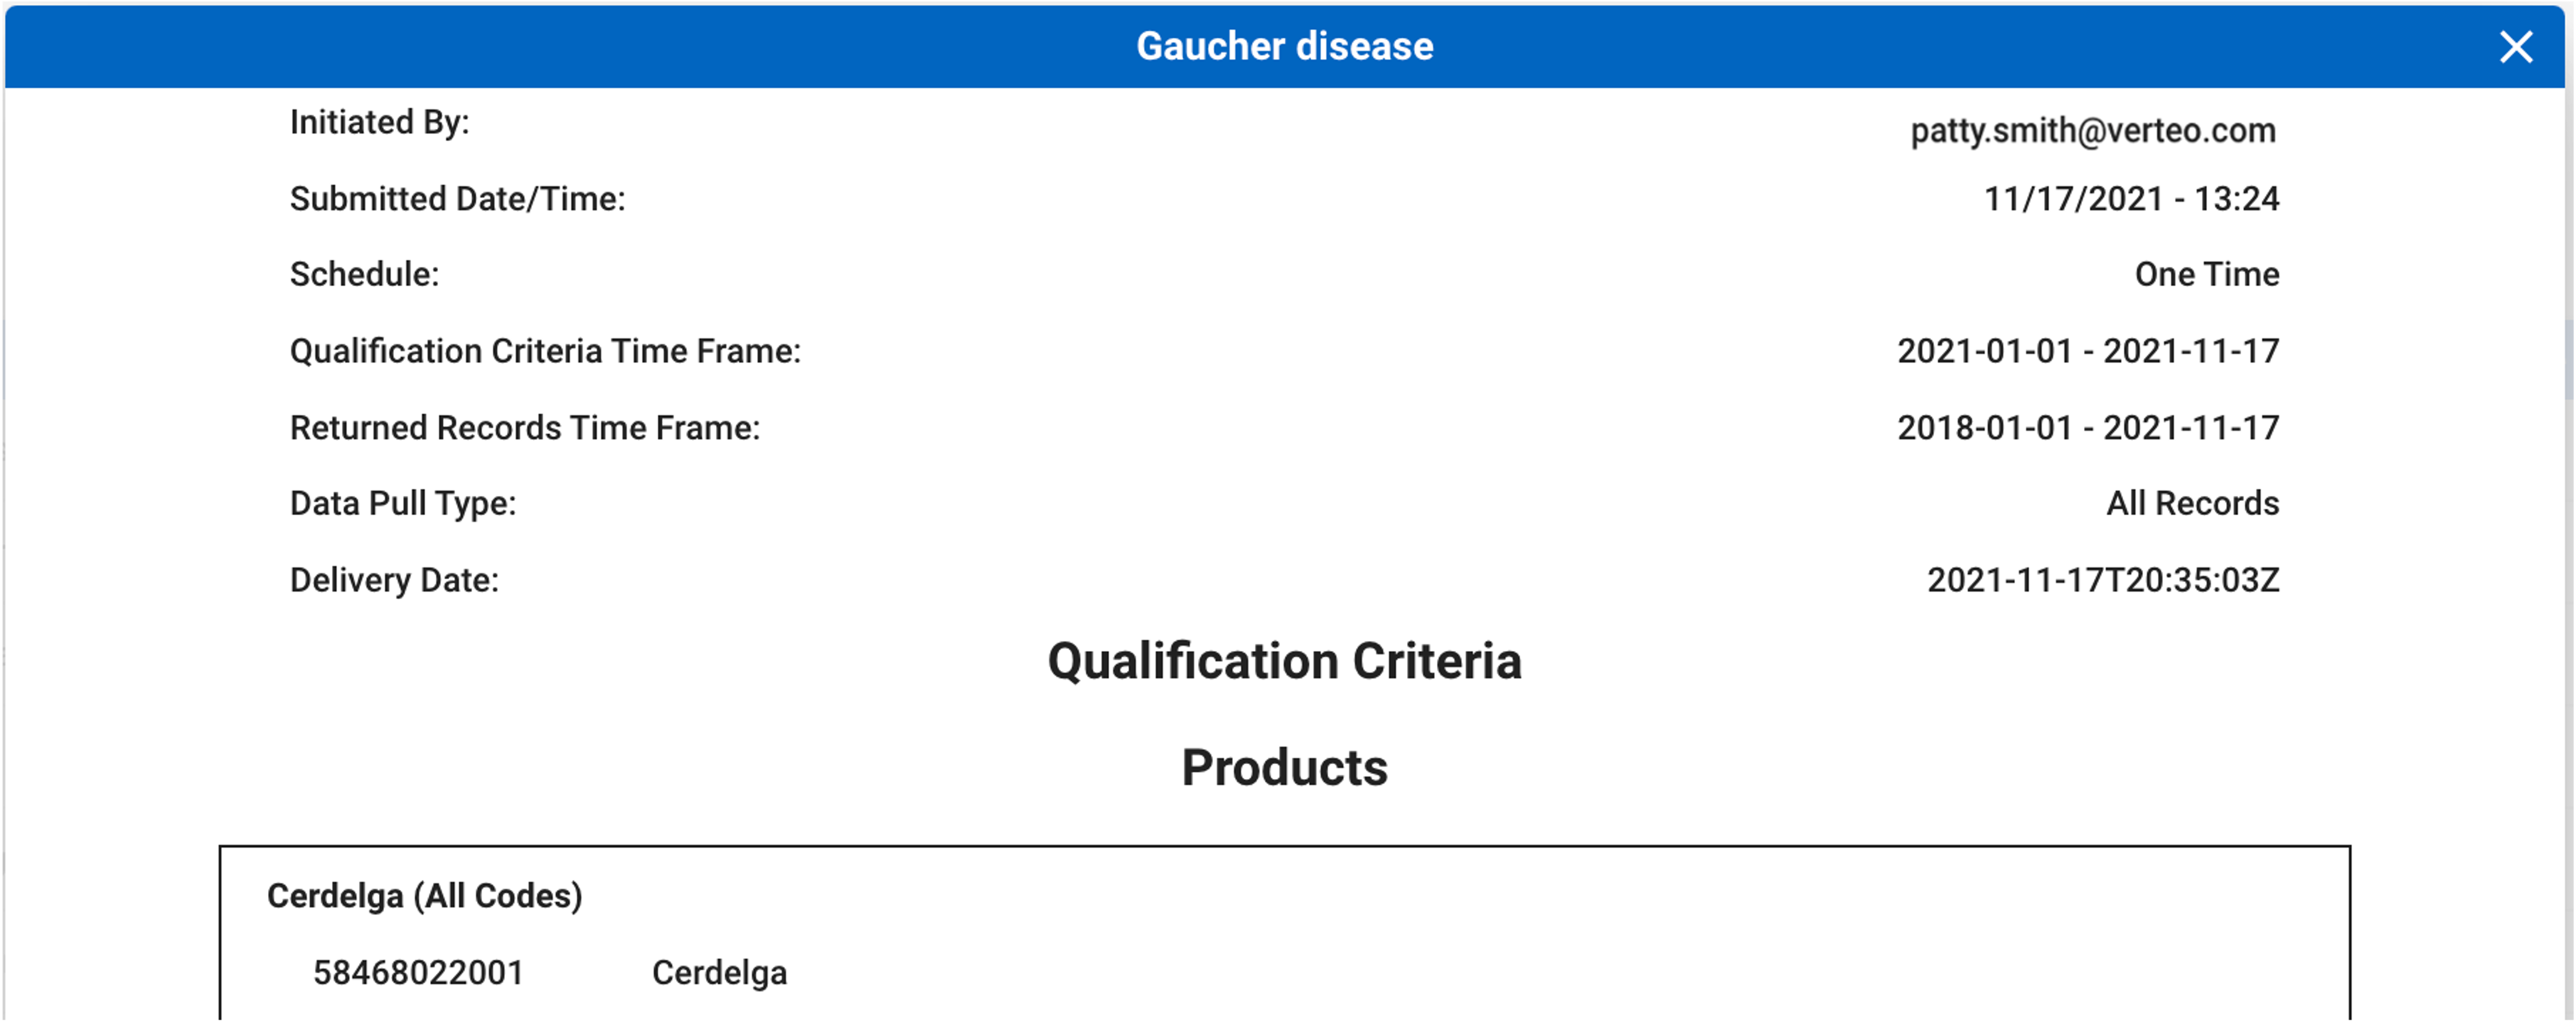
For completed one-time and monthly jobs, you also have the ability to download the Job Summary file directly from the receipt. Refer to Job Summary for more information on the Job Summary file.

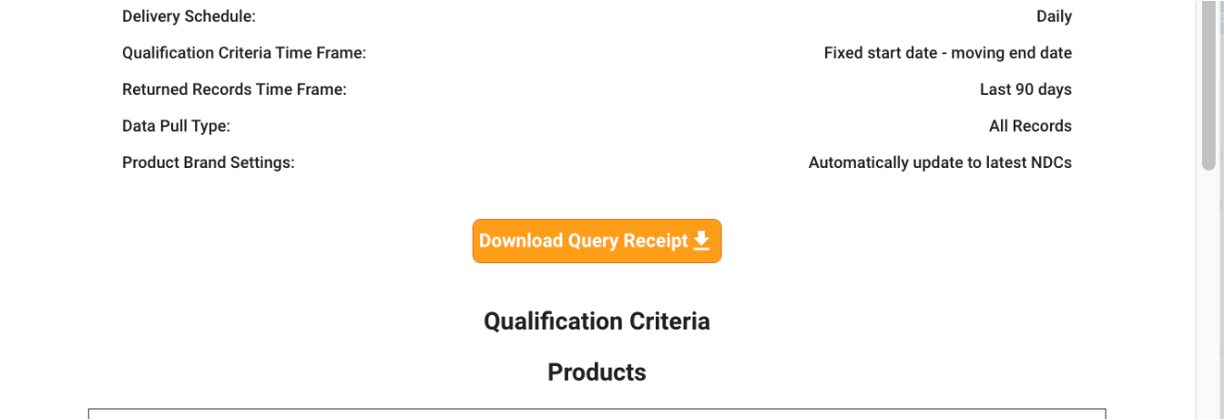
For weekly and daily data, the Query Receipt file is available instead of the Job Summary file. The Query Receipt file contains the latest information about the query and is updated when updates are made to the query, including changes in NDCs if they are automatically included. The Excel file is available via the Download Query Receipt button on the Query-level Receipt in the Portal, which can be located by clicking on the Query ID for a weekly or daily job.
Scheduled Jobs in Job Manager
Scheduled (monthly, weekly, and daily) jobs also contain an expandable query row that allows you to see the details of each individual job within the query. The query row contains information that applies to all jobs within the query, such as Query ID and Name, Compass Product, Subproduct, Initiated By, and Delivery Schedule. The job rows contain detailed information about each delivery such as their Job ID, Status, and delivery Date & Time. To expand and collapse a scheduled job, click the arrow in the query ID column.


You can also view the query and job receipts for scheduled jobs by clicking on their respective IDs. For scheduled jobs, the information specific to an individual job such as Job ID, the exact delivery date and location, and any job-specific updates (e.g. refreshed dates) will be reflected in the job receipt only. The query receipt for scheduled jobs contains information that applies to all jobs within the query.
Note that for scheduled jobs, only the most recent 7 jobs are shown in Job Manager. Older job information can be retrieved via the Compass API.
Job Manager Actions (Submitted)
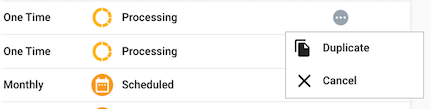
The actions that can be performed on your submitted queries will be displayed in the Actions menu, located on the right in the Job Manager. To view the actions for a query or job, click on the Actions menu button.

Note that the available actions will vary depending on the query type, parameters, and status. The following actions are available to perform on submitted queries/jobs in Job Manager:
- Duplicate - Duplicate an existing query, make adjustments, and submit it as a new query.
- Schedule - Appears on Patient & Pathway one time pulls; allows you to submit a new recurring job utilizing the one time pull parameters.
- Sharing Settings - Manage permissions, user roles, and email notification settings for jobs.
- Send to Partner - Share the data for completed jobs with an analytic partner.
- Download Data - Download the data for completed jobs to your computer.
- Edit - Edit query parameters for recurring jobs.
- Full Refresh - Opt to receive a full refresh of data for an ongoing scheduled job.
- Cancel - Cancel a currently processing or scheduled job to stop it from running.
Duplicate
The Duplicate action allows you to duplicate an existing query (either submitted or draft), make any necessary adjustments, then submit it as a new query. Upon clicking Duplicate, you will be prompted to provide a name for the new query. After providing a new name, click “Save”. You will then be taken to the Pull Data tab for the Veeva Compass product associated with the query you are duplicating, where you can make revisions to the query (if desired) before re-submitting.
Schedule
The Schedule action allows you to schedule a one time pull query on a recurring basis, using the same parameters (e.g. qualification criteria, returned records) as the one time pull. Schedule is available only on queries with the following parameters: Subproduct = Patient or Pathway; Cadence = One Time; and Status = Completed.
Upon clicking Schedule, you will be prompted to confirm you would like to schedule the query. After clicking “Continue”, you will be taken to the Schedule (Compass Patient) step, where you can then define the time frames for your scheduled job. You may also use the “Back” and “Next” buttons to navigate through previous data pull steps and make any necessary adjustments. After clicking “Submit”, the scheduled job will appear as a new query in Job Manager.
Sharing Settings
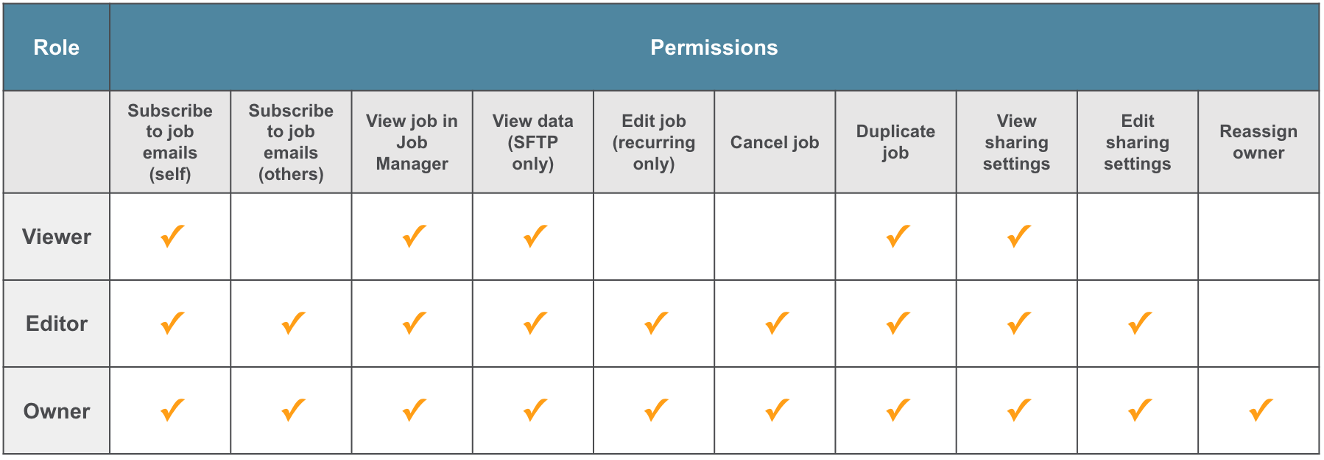
Sharing settings allow users to manage roles and access to jobs. These roles determine the user’s permissions (allowed actions) on the job. Roles can be assigned to individual users or groups. Users can also subscribe to job email notifications (e.g. job completion emails) via sharing settings.
Sharing settings are initially set when submitting a job, but can be edited anytime in the Job Manager. Upon clicking Sharing Settings, a window will open up where you can manage sharing settings. You can view details, add or remove existing users/groups (depending on your role), and update your email notification settings.

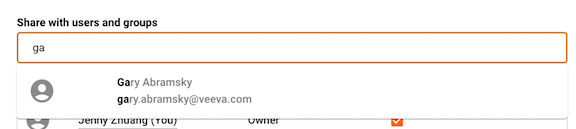
You may add users and groups to the sharing settings by searching in the “Share with users and groups” search bar, then clicking to select the user or group. The list of available users and groups will be filtered to those associated with the selected license for that job.
You can add additional users and groups to the sharing settings by searching in the “Share with users and groups” search bar, then clicking to select the user or group. The list of available users and groups will be filtered to those associated with the selected license.
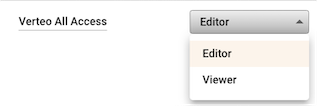
By default, the newly added user/group will be assigned the Viewer role. To update the role for a user or group, click on the drop-down menu in the Role column. Note that to reassign another user as the Owner, you must submit the job first, then update the sharing settings in Job Manager.
To reassign another user as the Owner of a job, click on the drop-down and select the “Owner” role. Note that each job can only have one Owner, and the Owner role can only be granted to an individual user (not a group).
The table below provides details of permissions that are available for each role.
You can also subscribe users or groups to receive email notifications related to the job, such as when the job completes or is cancelled. To subscribe a user or group to email notifications, select the “Email notifications” checkbox.

Note that for one time jobs, email notification settings can only be updated when the job is submitted or during processing. For scheduled jobs, email notification settings can be changed at any time, and will apply to any future jobs.
Users who are assigned any role (either via a group or as an individual user) can manage their own email notification setting for a job. Their individual email notification setting overrides any group email notification settings.
You may preview the list of users in a group by hovering over the group name. To remove a user or group from sharing settings, click on the “-” button.
Click on “Save” or “Done” to close the sharing settings window and save any changes.
Send to Partner
The Share action allows you to share your completed job with a partner. Share is available only on Patient Data queries with Status = Completed. Share is currently only available for one time and monthly jobs. Note that for monthly jobs, Share will appear only on the query row and not for individual job rows. Upon clicking Share, you will be prompted to complete the Data Share Form. Once your data has been shared, it can be managed in the Data Shares tab.
Download Data
The Download action allows you to download your data files directly to your computer. Once your job has completed processing, you can download the data file directly from the Portal by clicking the Download button on the job line item in the Job Manager. The data file will download directly to your computer and be available in your default download location on your computer. Download is available only for Patient or Pathway jobs with fewer than 800k records, and for Prescriber, Zip, State, and National jobs delivered in the Excel format. Note that Excel download is not available for daily or weekly jobs.
Edit (Scheduled Jobs)
The Edit action on scheduled jobs allows you to edit the query parameters of an existing, submitted scheduled job, which will then be incorporated into future jobs. Note that this differs from the edit functionality available on drafts, which allows you to edit a draft prior to submitting the query.
Upon clicking Edit, you will be taken to the Review & Submit step. Note that the Delivery Schedule for a scheduled job cannot be updated (e.g. a monthly job cannot be switched to one time). If you would like to edit the Delivery Schedule using the same query parameters, use the Duplicate action. If a scheduled job is edited while a job is in processing, the edits will automatically be applied to the following delivery. Upon submitting the edits, you will see the delivery where the edits will be applied.
Full Refresh
The Full Refresh action allows you to opt to have a full refresh of the data set rather than the standard scheduled dates for a specific upcoming scheduled job.
For example, you may have a weekly job with an initial time period of 2022-current, and the ongoing scheduled weekly jobs provide the most recent 13 weeks of data. The full refresh feature allows you to select a lookback period in order to refresh your scheduled data set after schema updates or with historical data coming from new data suppliers, without needing to submit a separate data pull. This lookback period can be the same as the original query or set a new time frame. After a full refresh is completed, the future jobs will return to the original scheduled time frames.
The full refresh action is available for monthly, weekly, and daily jobs. Users with the Owner or Editor role on the scheduled job sharing settings will be able to submit full refreshes for jobs.
To schedule a full refresh, select the Full Refresh action for the upcoming job you would like to refresh. You will be prompted to select dates for your full refresh. You can either use the same dates or different dates for both the qualification criteria and returned records time frames.

Once you have selected your dates, click on “Submit Refresh”. Once the full refresh job runs, it will use the selected dates. Future jobs will return to the original schedule dates. To cancel a scheduled full refresh, click on “Cancel Refresh” for the job you would like to cancel the refresh for. Note that full refreshes cannot be cancelled once the job is processing.
Cancel
The Cancel action allows you to cancel currently processing and upcoming scheduled jobs to stop them from running. Scheduled jobs (monthly, weekly, and daily) can be cancelled either at a query level or an individual job level, while one-time jobs can be cancelled on an individual job level only.
For scheduled jobs, cancelling on the query level means that all upcoming scheduled jobs (currently processing and future) in the series will be cancelled. Cancelling on the individual job level means that only that specific job will be cancelled, but other future jobs in the schedule will continue to run.
Below is a summary of job types and statuses where the Cancel action is available:

To cancel a scheduled job on the query level, click on the Actions menu on the Query ID row, then select Cancel.

To cancel an individual job within a series, expand the query row using the arrow next to the Query ID, then click on the Actions menu for the upcoming scheduled or processing job that you would like to cancel, then select Cancel.

To cancel a processing one-time job, click on the Actions menu for the job you would like to cancel, then select Cancel.
Note that once a job is cancelled, the action cannot be undone. If you would like to rerun a cancelled job, you may duplicate the job and submit it as a new job.
Managing Drafts
The drafts table in Job Manager contains high-level information about your draft queries. The following information is displayed in the drafts table:
- Query - Name provided for that query upon saving.
- Created By - User who created the draft query, which can be viewed by hovering over the user icon.
- Created Date - Date the draft query was created.
- Modified Date - Date the draft query was last modified.
- License Name - Name and ID of the license the draft query was saved under.
- Compass Product - Veeva Compass product for that query (e.g. Patient, Pathway, Prescriber, National).
- Subproduct - Subproduct for that query, or the type of data that will be received (e.g. Patient, Pathway, Prescriber, Zip, National, State)
- Actions - Actions that are available on the draft (e.g. edit, duplicate, delete). For more information on draft query actions, see Job Manager Actions (Draft).
Saving Drafts
At any point in the data pull process, you may choose to save your query as a draft. This will allow you to save your current query parameters and continue editing your query at a later time. To save your query as a draft, click on the “Save” button in the upper-left corner.

This will prompt you to name your draft query. After saving your draft, the query name will then be populated in the upper-left corner. You may rename your draft query by clicking on the query name and providing a new name.
Note Query names can only consist of letters, numbers, underscores and spaces.

You may continue to save the draft at any point in the data pull process. If you would like to update the existing draft with any changes, click on “Save”. If you would like to create a new draft to store any additional changes, click “Save As”. This will prompt you to enter a name for the new draft.
Job Manager Actions (Draft)
The following actions are available to perform on draft queries in Job Manager via the Actions menu:
- Edit - Edit and submit an existing draft query.
- Duplicate - Duplicate an existing query, make adjustments, and submit it as a new query.
- Delete - Delete an existing draft query.
Edit
The Edit action on draft queries allows you to edit the query parameters of an existing draft in order to submit. Upon clicking Edit, you will be taken to the step where the draft was most recently saved. You may then make additional edits to your draft query, and save or submit as desired. For information on submitting Compass Patient queries, refer to Review & Submit.
Duplicate
The Duplicate action allows you to duplicate an existing query (either submitted or draft), make any necessary adjustments, then submit it as a new query. Upon clicking Duplicate, you will be prompted to provide a name for the new query. After providing a new name, click “Save”. You will then be taken to the Pull Data tab for the Veeva Compass product associated with the query you are duplicating, where you can make revisions to the query (if desired) before re-submitting.
Delete
The Delete action on draft queries allows you to delete a draft that you no longer need. Upon clicking Delete, you will be prompted to confirm you would like to delete the draft. Click “Continue” to delete the draft.
Note Once a draft is deleted, it cannot be recovered.